 |
| It's certainly big enough to work; one of the longer in the game. The colors are a bit sickly, though. |
Cut Man's Stage just doesn't add up, and it's a little hard to put one's finger on just exactly why. Hopefully my analysis will clear things up once we've broken the stage down, but I can point out a few things right off the bat:
- Out of all the stages in this game, Cut Man's has the blandest, ugliest graphics; Bomb Man's stage had no logic, but at least the colors popped and the vertical-horizontal design gave it visual interest. Here we have nothing but sickly turquoise sky, green brickwork, and dull gray interior wall. It appears to be a large building of some sort, perhaps in disrepair, but the lack of coherent structure and dull, unpleasant colors detract a great deal from the stage's aesthetic appeal.
- Cut Man's stage is, like Bomb Man's, divided into alternate vertical and horizontal sections; however, this time, it is the horizontal sections that provide fleeting breaks between sections of vertical OROCs; the emphasis on vertical movement slows the pace of the stage, and since it's already long the ultimate feel of the stage is slow and tedious, especially since the stage offers no novel hazards to spice things up.
- Copy-pasting makes another appearance here, and this time it isn't even much of a mix-up, the way it was in Bomb Man's stage; rather, it is dull and repetitive. That combined with the poor design of many of the vertical areas, which are by their very nature repetitive, gives the stage a...repetitive feel. That is repetitive. And repeats itself.
Cut Man's Stage: Breakdown
Part 1: A Slow Start
Map
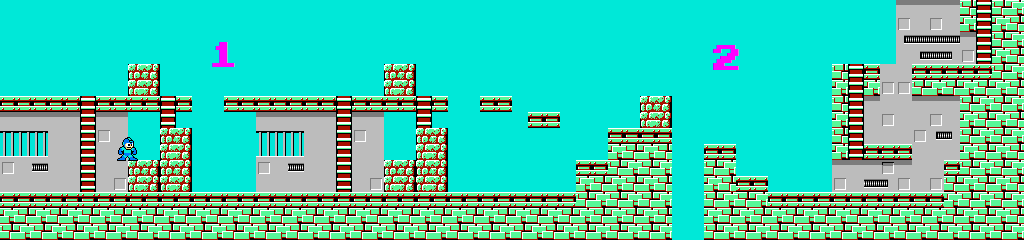
Description
Do you remember how I pointed out, several posts ago, that all of the mechanics of Mega Man were designed to give the player the feeling of unhindered movement? Well, this stage gets off to a bad start by opening with a section designed to defeat those mechanics, and worse, uselessly. And it does it twice. With copy-pasted screens. The choices do get somewhat better from there, at least for a while, though.
Breakdown
- These two identical screens force a player who either has not beaten Guts Man or wants to preserve the Super Arm ammo to first backtrack and then navigate around the loose blocks via the ladders, all while two flocks of Bladers pester him. Bladers are especially annoying on broken terrain. It's a poor tutorial element to place at the beginning of the stage, but I will give the design here two points:
- The ladders here provide the player with a low-pressure opportunity to get used to the movement and physics on them before moving on to stiffer challenges involving them later.
- The loose blocks, though in my opinion poorly placed, do provide players with a hint that the Super Arm might be a good weapon to have here, as it so happens that Cut Man is weak against it. This kind of hinting is only made possible by the stage-contextual nature of the Super Arm weapon, of course, and Cut Man's stage is not the only one to have blocks in it, but they are more plentiful here than in any other; most areas have at least one laying about.
- This pit hazard does not provide a serious threat even with the Beak located just past it. I am not entirely sure why it was included at all, since pit hazards will not play a significant role in this stage. These exact two screens will reappear in the next horizontal section, however, with the only change being the exchange of Beaks for Octopus Batteries. Speaking of the Beaks, the two that are located here are pretty clearly placed for tutorial purposes. The first one is placed in such a way that a cautiously proceeding player is able to fire at it just as it opens, showing him the enemy's weakness, while the second is placed in a more threatening position to make him notice the four bullet trajectories. Observe:

Cool mint lines indicate trajectories that are not a threat to a player
who is being careful and taking out Beaks when possible. Spicy
chili lines indicate trajectories that the player must cross before he
can destroy the associated Beak, assuming he does not have
the Elec Beam.

I have roughly marked the trajectories of the four shots fired by each Beak on this screen. Bearing in mind that shots are fired sequentially starting at the top, you can see that a player approaching with any sense of caution is going to have a chance to see the two mildly threatening shots fired by the rightmost Beak at the ladder he will have to climb to progress. At this time he can choose (Equivalent Path Choice) to go the long way around to get a clearer shot at the Beak (and avoid the annoying jump into the one-tile opening to reach the ladder) or else go straight up the ladder and either time his movement to avoid the shots or pause briefly to fire at it from the ladder. In either case, the layout of the stage ensures that even a first-time player will have plenty of time to observe and deal with the Beak enemy's behavior before moving on to the gauntlet coming up in the next section.
Video Demonstration
Part 2: The Gauntlet In This Section
Map

Description
Here we come to the meat of Cut Man's stage: the first of two three-screen gauntlets. This one features the Beaks we dealt with just a moment ago, in three different configurations. The vertical movement here works, mostly, because it relies on ladders broken by horizontal movement, and thus fits in with the natural flow of Mega Man gameplay; the repetition is not so good, however. Still, even working with the limited elements present, there are signs of smart design and I plan to illustrate them as clearly as I can.
Breakdown
- The screens in this section are a rough process of escalation; taking the end of the previous section as the first 'screen' in this series (which it is, more or less), then this is the second, and the escalation begins right away. First, there are three Beaks here instead of two, and second, for the first time the player is forced to cross the line of fire from some of them (with restricted ladder movement, no less) before gaining the opportunity to retaliate, requiring the player to observe timing.

As you can see, the two beaks at the top fire their last bullets along the same trajectory, directly across the ladder the player must climb in order to reach a level where he can face them. That level itself is also peppered by trajectories, but the initial shots of each Beak, fired harmlessly into the air, should give him ample time to eliminate the Beaks safely before much danger. - The next screen is more of the same, but with the stakes slightly higher.

As you can see, the Beaks here have been placed in more threatening positions, with one firing directly at the player almost immediately, and two more covering an area the player must negotiate in order to approach safely from the right; if he chooses to take the initial ladder, he can avoid one of them but must negotiate the topmost Beak's lowest shot still. More importantly, the player must deal with shots going in both directions now, which can be disorienting for a novice player. - Finally,

Here we see the culmination of the mini-progression of Beak gauntlets. There is a gap the player must cross in order to proceed; only one pathway is feasible, and it takes the player directly through the line of fire of a mid-range shot from the middle Beak, requiring careful timing in order to avoid taking damage. In addition, the player is immediately threatened by a Beak at his level upon entering the screen, and must react by shooting it or reaching the top of the ladder and jumping over the second shot in order to avoid damage. I don't want to give the impression that this screen is hard, exactly, but it is at least harder than the previous ones.


Overall Analysis
Plenty of smart design choices in this section. The difficulty of each screen advances smoothly and never in an unfair way; the relationship between the Beaks' behavior (firing sequentially from the top down) and the player's progress through the stage (moving from the bottom to the top of each screen) is exploited to ensure he always has time to react. The relationship between enemy behaviors and terrain plays a key role in keeping up challenge and engagement with limited elements, it would seem. Perhaps that is why the newer Castlevania games, with their enormous and mostly barren maps, require such large bestiaries in order to keep up player interest?
It's just a shame the rest of the level doesn't hold up to this precedent...
Video Demonstration
Part 3: A Brief Interlude
Map

Description
As I explained in the introduction, Cut Man's stage flips the formula of Bomb Man's; the horizontal sections make for brief interludes between the meatier vertical ones, rather than vice-versa. Here we see the first such area - a mere three screens, the third of which really counts as the first screen of the next vertical section if we were to be nit-picky. I would never be nit-picky. Never.
Breakdown
- Here we find the sole unique hazard of Cut Man's stage: a Super Cutter launcher. It consists of a big gray blocky structure (entirely in the background), the black opening of which dispenses cutters in an arc aimed directly at Mega Man. A fairly basic hazard, but one with which much could be done. Nothing is done with it here - the cutters start flying once the player starts right from the ladder and stop after he jumps onto the ledge to the right - but of course the player needs a chance to learn its behavior.
- Again we see this structure; this time instead of Bladers a trio of Flea bots jump at the player, often catching him unawares even if he is expecting them. Not a major threat, but at least it's something different from earlier. Still, since Fleas aren't used for anything later in the stage it feels like a bit of a non-sequitur.
- As I said, this is really the screen where the next vertical section begins; I include it here because a first-time player will not perceive it so due to the scrolling mechanics of Mega Man I. The layout is, again, identical to the corresponding area in the first section, but this time the flavor of the day is Octopus Batteries, enemies which fly either vertically or horizontally between walls. They are configured so:

The lines obviously mark the paths the Octopus Batteries move
across. Back and forth, up and down.
Now, as before, there are elements of smart design. The first Octopus Battery the player must negotiate is trapped in a narrow area directly in his path, presenting no active threat but forcing a response; this is as effective a tutorial as any normal player needs. The developers then move right into more advanced placement; the player must deal with at least one of the second Batteries in a...somewhat more threatening situation...? I just...I don't...
...
Forget it. I'll deal with that issue in the next section. Here's a video or something, I don't know.

Part 4: A Rustier Gauntlet
Map
 Description
On the surface this section looks exceedingly similar to Section 2, but it isn't. Once again, the player is scaling what seems to be an industrial building, though this time the presence of two walls indicates an interior, despite the gaps in the background, and once again the hazard takes the form of a gauntlet consisting of a single type of enemy in what were apparently intended to be increasingly dangerous configurations. My use of softeners in that last sentence will become clear in a moment.
Before moving on, I would like to say that, despite the highly critical tone I am about to take, I approve of what the designers were going for here. Taking the same basic structure and repeating it with variation is not a bad way to sustain interest; one could say that that sort of repetition forms the basis of most structured art forms. This is a good design choice that we will see in later games. It falls flat here not because of what it is at core, but because of smaller shortcomings, which I will try to indicate.
Before moving on, I would like to say that, despite the highly critical tone I am about to take, I approve of what the designers were going for here. Taking the same basic structure and repeating it with variation is not a bad way to sustain interest; one could say that that sort of repetition forms the basis of most structured art forms. This is a good design choice that we will see in later games. It falls flat here not because of what it is at core, but because of smaller shortcomings, which I will try to indicate.
Breakdown
- Okay, just look at it:
 Do you see what the problem is yet? No?
 - Let's look at the next room, then:
 Well? Anything?
 - How about here:

Do you get it yet?


The lines of movement really should make the issue with this section clear, but I'll spell it out anyway: Octopus Batteries are not threatening. They don't do anything interesting; they just move back and forth along a single line, either vertical or horizontal. They don't fire anything, and they don't change their movement in any way. Because of this, there is literally no reason why a player who is patient enough to wait for each one that blocks his path to come in range and kill it should ever take damage. They provide no challenge in the sense of difficulty; they merely punish a player who does not feel like standing still to wait for them to move. Novice players often do not realize this and take damage, but the moment a player grasps the nature of these challenges they immediately become trivial and annoying, nothing but a time-waster to draw out the level.
You can see in the three areas that the designers were going for something along the lines of an escalation, with more lines of movement crossing the player's path and more claustrophobic formations, but they just didn't have the tools to do it; the behavior of the Octopus Battery doesn't allow for challenging level design on its own. It isn't a good enemy design for this game; Mega Man's freedom of movement and attack abilities are too strong for it. And the developers realized it, too, because no enemy like the Octopus Battery ever appeared in the series again. Ever. At least, not on the NES, and I can't off the top of my head think of an enemy like it in any of the later games either.
I'm going to delve into some enemy design stuff later on in this blog when I've got a bit more context and have solidified my thoughts a bit more clearly, so I'll get back to this issue later; there's quite a bit to say on it. For now, suffice it to stress that this section of Cut Man's stage fails solely because the enemy design was not suitable to the overall game design choices, and therefore the developers' intention was foiled from the beginning. It was a lesson the they learned well, I think, because later games in the series showed some of the most brilliant enemy design in any NES platformer series.
Video Demonstration
I would like to take this opportunity to debut a new feature of my stage breakdowns: not having a video demonstration for every part of everys tage! There is literally nothing in any of my video footage of this section worth showing; the info is all in the analysis already. If you really want to see it, I'm sure there's plenty of footage online.
Part 5: The Apex, Zenith, Summit, and Highest Point
Map

Description
I...God, it's hard to write coherently about this stage. What do I say? In a later game, this area would have marked a striking change in the stage and likely would have been a memorable moment; it's the highest point of the map and marks a sharp transition in the design philosophy of the stage, from a series of progress-blocking gauntlets to a rather quick drop-down, and then to the end. But, instead, it's another mere interlude. It's not that it's actively bad, not like some of the things in Guts Man's stage, and nowhere near as bad as some of the things we'll see next in Elec Man's stage, but...it just feels like wasted space.
Breakdown
- This bit right here kind of sums up what's wrong with this stage, doesn't it? This is the second and last appearance of Super Cutters in the Mega Man series, and it's identical to the first. It's nice to see something different, but nothing is being done with it; there are no extra hazards added to make it more challenging, and since the 'solution' to the Super Cutter dispenser is 'run straight forward without stopping', which is what any player is ordinarily motivated to do, it falls rather flat. This obstacle had potential to play a role in integrated Threat Management Challenges or High Pressure Challenges, but neither of those appears in this stage.
- Some Bladers attack the player here; but since this terrain actually makes them less of a threat than the ones at the start of the stage, once more it falls rather flat. In a minor act of mercy, the developers left an easily accessible Big Life Energy for players who didn't fare well in the earlier sections. Once that's been collected (it hardly seems worth calling it an Optional Path Incentive, though I suppose it is), the player can choose either to take the ladder or jump straight down. Most likely take the ladder by instinct, out of a sense of caution, which as we will see in the next section is a good idea.
Part 6: Downhill From Here
Map

Description
This area is the reverse of previous sections, in more ways than one. The screen layout is reversed from the first Beak gauntlet - the building is now on the right (I suppose the player is now descending the other side of the building or buildings he has been climbing all this time) and movement is, of course, downward. Downward movement changes things in Mega Man; falling is easy and quick, and many stages in the game take advantage of this to force new challenges on the player.
That's why it's a bit strange that, contrary to expectations, this area is actually another series of OROCs, albeit somewhat simpler than before. Let's take a closer look.
Breakdown
- Here the player, if he has taken the ladder or manages to land on the platform it rests on after dropping, is presented once more with the choice between a quick, risky drop or a slower, safer ladder. Flying Shells once more make a late-stage appearance here, incentivizing the latter (the ladder, ha ha). This time they pose no serious threat. I am a little puzzled about the purpose of the right-most two-tile platform in this design; it might be there to balance the visuals, I suppose. I see no gameplay purpose for it. The Flying Shells appear just above those two platforms, providing a descending player with an opportunity to take out one, securing a break in their spawning to safely go down the ladder if he chooses to do so.
- And here we see why the cautious path is better. The spikes above are placed so as to neatly trap and kill a hasty player trying to save time by dropping down the right. This is another example of malicious design, which I define as purposefully enticing and then punishing certain behaviors on the part of players ("Here, have a short-cut! Uh-oh, gotcha!"). I have mixed feelings about it; in small measures it can add a dose of healthy fear to the experience of playing ("You'd better take my game seriously and be careful."), and it can even be humorous - the famously difficult indie platformer I Wanna Be The Guy is based largely on this principle, and Dark Souls takes some of its appeal from it as well. On the other hand, large amounts of it can discourage or frustrate many players, especially when they are not properly warned beforehand. Of course, Mega Man is an old-school series, and malicious design was quite common; likely anybody picking this game up expected to die plenty of questionable deaths. But the Mega Man series was also one of the earlier game franchises to eschew this style of design, and it will appear far less often in later games, and I think this choice made up part of its lasting success.
Part 7: The Marathon's End
Map

Description
No, I'm not doing another description and I'm not doing a breakdown or video demo either. This is identical to the end of Guts Man's stage, down to the last detail: a drop-down and a Forced Encounter with a lone Big Eye, then the door. I will say only one thing: I think I can understand how a semi-climactic encounter with a larger baddie might be an attractive way to end a stage. But the developers soon abandoned this technique, and instead placed their mini-bosses in the middle of stages. Why? Because putting something right before the Robot Master detracts from the drama of the final run-up. Some stages in later games will still place a large hopping enemy directly in front of the door (perhaps out of nostalgia), but none of those enemies will be as hard to kill or as dangerous as the Big Eye.
Nor will they look as much like an old-fashioned telephone riding The Noid's crusher pogo-stick. >:[
No comments:
Post a Comment